Crime Scene Investigation
Who What When Where and Why?

Who took a bite out of the candy? Sticky fingers have been found on the broken aquarium glass. Wet footprints lead to the open window. What is that powdery substance next to the broken piggy bank? Answering these questions is what forensic science is all about.
Forensic science is the study of objects that relate to a crime. The objects are evidence and analyzing the evidence is what forensic scientists do. They observe, classify, compare, use numbers, measure, predict, interpret data, and draw inferences. Scientists they are and crimes they solve.
Learn how to be a crime solver by exploring the world of the forensic scientist. Before studying a crime scene we must practice the skills needed in analyzing evidence. After you have completed the skill building assignments, try solving the crime.
| Fingerprinting | Powders | Solve the Crime | |||
| Teeth Impressions | Foot to Height | Resources |
Now that you know the history of fingerprinting, let's take our own. Then, examine and classify them. Take a magnifying glass and study the patterns on your fingers. 1. What do you notice? Fingerprints are impressions that are created by ridges on the skin. When a person touches an object, the perspiration, oils, and amino acids on the skin are transferred to the object, frequently, leaving an impression of the ridge pattern. This is called a fingerprint. No two people have the same fingerprints, not even identical twins. The materials you will need to take your fingerprints are as follows:
1. Rub a small dark area with a pencil point on a sheet of white paper. 2. Press and rub your right index finger in the pencil-lead dust. 3. Place the sticky side of a piece of transparent tape on the dusted finger. 4. Take the tape with the fingerprint and tape it to a clean sheet of white paper. 5. Label the fingerprint to identify which finger you have printed. 6. Continue the process until you have all ten fingers printed.
2. Are the patterns the same on each finger?
Create your own set of fingerprints.
![]()
Magnifying glass
![]()
Pencil
![]()
Transparent tape
![]()
Marking pen
![]() Taking a Print
Taking a Print
Fingerprints may also be taken by pressing one finger at a time into an inkpad and then pressing and rolling each finger onto a sheet of white paper. Be sure to label each print. The prints may smudge if not done carefully. Also be sure clothing is protected.
Some employers require a background check using fingerprints. View an example of a background check form with Adobe Acrobat.
Go to this Website for help with your classification:
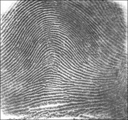
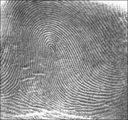
Once the fingerprints are taken and labeled, forensic scientists use a classification system to identify them. The three basic fingerprint patterns are Whorl, Arch, and Loop. There are more complex classification systems that further break down the pattern to plain arches or tented arches. Loops may be radial or ulnar. Whorls also have smaller classifications.

![]() Study your fingerprints and classify them. Then create a database of the patterns in your class and compare them. Use the words below for your fields. Download the Appleworks database template or Microsoft Excel template.
Study your fingerprints and classify them. Then create a database of the patterns in your class and compare them. Use the words below for your fields. Download the Appleworks database template or Microsoft Excel template.
Solve Murder Mystery
http://www.bbc.co.uk/devon/murder/

http://pbskids.org/arthur/games/effectivedetective/effectivedetective.html